
Tutorials › ZDMA Firmware Flashing
ZDMA Firmware Flashing Guide
Flash your ZDMA in a few clicks with the LightningZ Flasher Tool — no Vivado, no drivers to hunt for. Download, unzip, plug in, flash.
Download LightningZ Flasher Tool (Windows 10/11, 64-bit)
The tool updates itself when a new version is available, so this link always gives you the latest release.
Before You Flash: the two chips
The ZDMA contains two chips with different jobs, each with its own firmware. We call them FPGA0 and FPGA1.
FPGA0 — PCIe / DMA Handles PCIe communication and implements the DMA function. This firmware is public in PCILEECH-FPGA; you can make limited modifications or buy firmware from others. When people say “firmware,” they usually mean this FPGA0 part.
FPGA1 — Thunderbolt Converts FPGA0’s data into the Thunderbolt protocol. It does not take part in the actual DMA function. Its firmware is unique to your board and is delivered by the tool automatically — you never pick a file. It must match the Thunderbolt driver version installed on the control computer. After updating FPGA1 firmware, you must reinstall the matching driver.
1. Before you start
- Use a normal USB data cable (USB 2.0 is fine). Do not use the Thunderbolt cable that comes with the board — it is not recognised on the JTAG port.
- The ZDMA must be powered: the yellow LED on the board must be solid on. If it is not, reseat the card or check the slot power.
- Plug the cable into the JTAG port of the ZDMA and into the PC.
2. First launch
- Unzip and run. Unzip the download anywhere (the Desktop is fine) and double-click
ZDMA-Flasher.exe. If Windows SmartScreen appears, click More info → Run anyway. - Accept the notice. Read and accept the legal and safety notice.
- Let the tool check your PC. If the FTDI driver is missing, the tool offers to install it offline from its own package: click Yes, accept the UAC prompt, then unplug and re-plug the USB cable and click Detect again.
- Wait for the green status. The status pill at the top right shows “ZDMA connected” when the board is detected.
3. Flash FPGA0 (your own firmware)
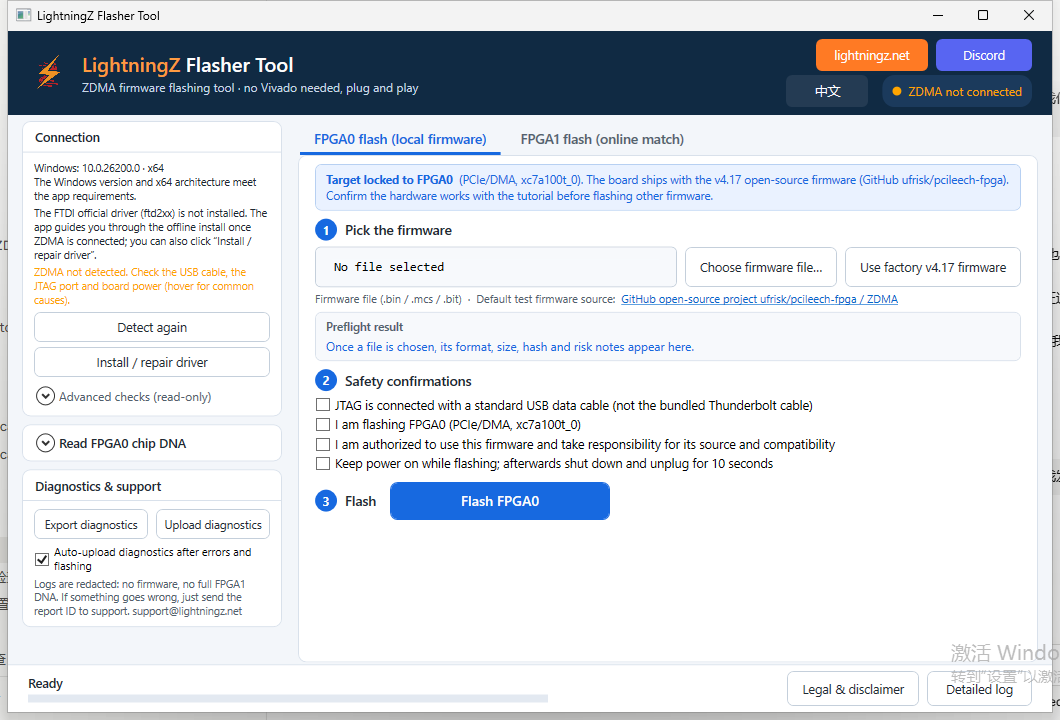
- Open the FPGA0 flash (local firmware) tab.
- Step 1 — choose the firmware. Click Choose firmware file… and pick your
.bin/.mcs/.bit. To restore the factory image, click Use factory v4.17 firmware instead. - Check the preflight box. Format, size and hash are shown, and the tool refuses files that do not belong on FPGA0.
- Step 2 — tick the four safety confirmations.
- Step 3 — click Flash FPGA0 and confirm. Erase, program and verify take about 5 minutes. Do not unplug the cable or close the tool.
- Power cycle. When the success message appears: shut down, unplug the board’s power for at least 10 seconds, then power on. A simple restart is not enough.
4. Flash FPGA1 (online matched firmware)
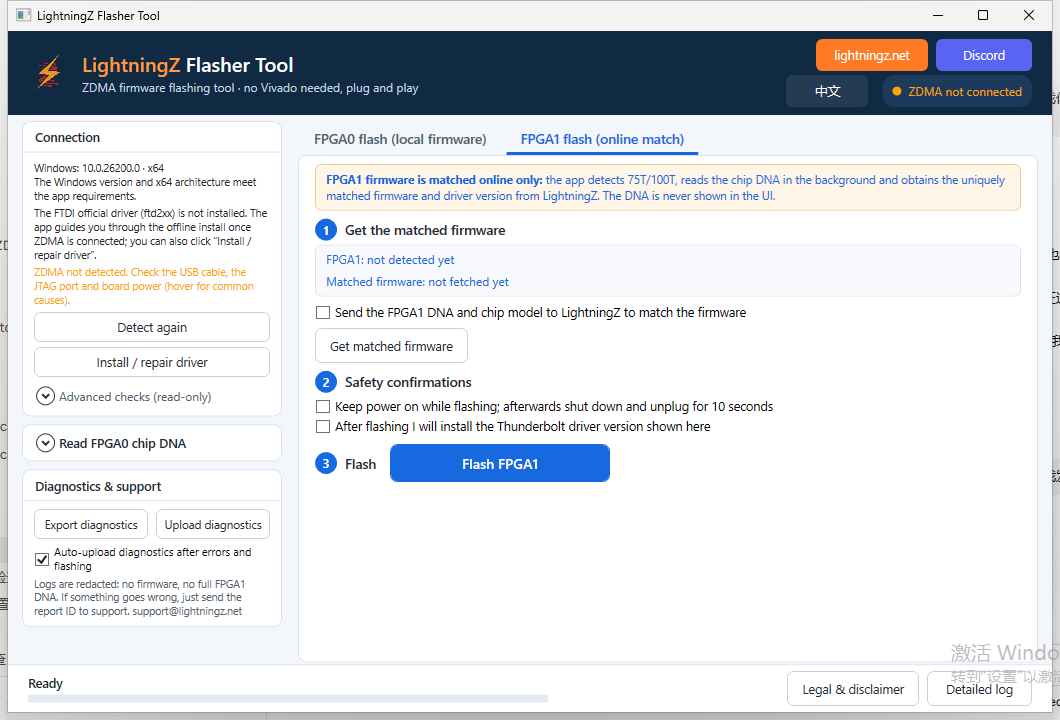
- Open the FPGA1 flash (online match) tab.
- Get the matched firmware. Tick the consent box and click Get matched firmware. The tool shows the matched firmware and the Thunderbolt driver version you will need afterwards.
- Tick the safety confirmations and click Flash FPGA1. This takes about 3 minutes.
- Power cycle and install the driver. Shut down, unplug power for 10 seconds, power on, then install the Thunderbolt driver version shown in the tool.
After flashing FPGA1 You must reinstall the Thunderbolt driver of the same version as the FPGA1 firmware in order to call DMA normally.
5. If something goes wrong
- The tool shows a device code at the top (like LZ-XXXX-XXXX-XXXX). Click Copy next to it and send it to support once; every diagnostics report uploaded after an error or a flash carries it — no screenshots or files needed.
- You can also click Upload log at any time, or switch automatic upload off in the left panel.
- Support: support@lightningz.net or Discord.
6. Updates
The tool checks for a signed update every time it starts. When a new version is available it downloads, verifies and restarts itself automatically — nothing to click, about a minute.